How to Import Existing VMWare VM-s into Terraform
-
 Gineesh Madapparambath
- Automation, Infrastructre & hardware, Terraform
- November 4, 2020
Terraform is an amazing tool for your infrastructure automation. Everything about your infrastructure can be write as code and maintain by team; means your infrastructure is transparent and immutable.
Also Read : Learning path and Exam Tips for HashiCorp Certified Terraform Associate .
(Cover Image: unsplash.com/@qwitka )
You might already know that, you can also import existing infrastructure into Terraform, and further infrastructure management can do via Terraform itself. It is simple and straightforward for cloud based infrastructure I noticed, some engineers are facing issue for importing existing VMWare VMs. So, this is a quick how-to guide for importing existing VMWare VMs into Terraform and we will simply import a single VM to show the capability.
Step 1: Collect Details of Existing VM from VMWare vCenter
Login to your VMWare vCenter and find the Virtual Machine details; make sure you have collected details like datacenter , vm folder , vm name , CPU , Memory , Disk etc.
If your Virtual Machine have special configurations like extra disks, extra network or different hardware specifications, make sure you include those details in Terraform code.
Step 2: Create Your Terraform Code for Existing VM
Terraform do not have a capability to import existing infrastructure to Terraform code; instead we need to write the Terraform configuration to match with existing infrastructure and import it.
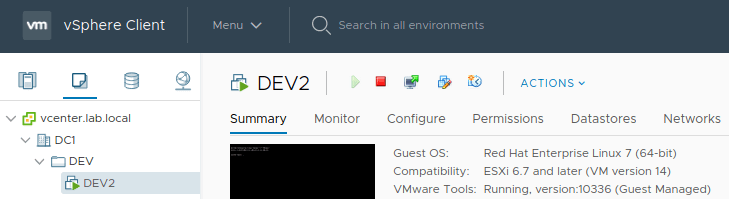
So below is my Terraform code for my existing VM named DEV2 and the path is /DC1/vm/DEV/DEV2 .
See the content of vmware-import-vm.tf
provider "vsphere" {
  user           = var.vsphere_user
  password       = var.vsphere_password
  vsphere_server = var.vsphere_server

  # If you have a self-signed cert
  allow_unverified_ssl = true
}

data "vsphere_datacenter" "dc" {
  name = "DC1"
}

data "vsphere_datastore" "datastore" {
  name          = "datastore1"
  datacenter_id = data.vsphere_datacenter.dc.id
}

data "vsphere_compute_cluster" "cluster" {
  name          = "AZ1"
  datacenter_id = data.vsphere_datacenter.dc.id
}

data "vsphere_network" "network" {
  name          = "VM Network"
  datacenter_id = data.vsphere_datacenter.dc.id
}

resource "vsphere_virtual_machine" "vm" {
  name             = "DEV2"
  resource_pool_id = data.vsphere_compute_cluster.cluster.resource_pool_id
  datastore_id     = data.vsphere_datastore.datastore.id

  wait_for_guest_net_timeout = 0
  wait_for_guest_ip_timeout  = 0

  # only if you DO NOT want to wait for an IP address
  wait_for_guest_net_routable = false

  num_cpus = 1
  memory   = 2048
  #guest_id = "other3xLinux64Guest"

  network_interface {
    network_id = data.vsphere_network.network.id
  }


  disk {
    label            = "disk0"
    size             = 20
    thin_provisioned = false
  }
}
I have also declared some variables for passing VMWare credential
$ cat variables.tf
variable "vsphere_user" {}
variable "vsphere_password" {}
For this demo, I am passing my VMWare vCenter credential via Environment Variables; see sample below.
$ export TF_VAR_vsphere_user='[email protected]'
$ export TF_VAR_vsphere_password='mypassword'
Step 3: Initialize your Terraform Code
Once you have your code is ready, you need to initialize it using terraform init , which will verify the environment and install necessary plugins and providers.
$ terraform init

Initializing the backend...

Initializing provider plugins...
- Finding latest version of hashicorp/vsphere...
- Installing hashicorp/vsphere v1.24.2...
- Installed hashicorp/vsphere v1.24.2 (signed by HashiCorp)

The following providers do not have any version constraints in configuration,
so the latest version was installed.

To prevent automatic upgrades to new major versions that may contain breaking
changes, we recommend adding version constraints in a required_providers block
in your configuration, with the constraint strings suggested below.

* hashicorp/vsphere: version = "~> 1.24.2"

Terraform has been successfully initialized!

You may now begin working with Terraform. Try running "terraform plan" to see
any changes that are required for your infrastructure. All Terraform commands
should now work.

If you ever set or change modules or backend configuration for Terraform,
rerun this command to reinitialize your working directory. If you forget, other
commands will detect it and remind you to do so if necessary.
And I just verified the current state managed by Terraform,
$ terraform show
No state.
Yes, we didn’t start it yet.
Note: If I do a terraform apply what will happen ? Simple, terraform will try to provision the VM but will end with an error saying VM with name DEV2 already exists. Anyway, this is not our case for this demo.
Step 4: Import the VM to Terraform State
So finally we are ready to import our existing VM to Terraform state.
$ terraform import vsphere_virtual_machine.vm /DC1/vm/DEV/DEV2
vsphere_virtual_machine.vm: Importing from ID "/DC1/vm/DEV/DEV2"...
vsphere_virtual_machine.vm: Import prepared!
  Prepared vsphere_virtual_machine for import
vsphere_virtual_machine.vm: Refreshing state... [id=4219040f-5842-ba52-b7e4-cd9064c1f36c]

Import successful!

The resources that were imported are shown above. These resources are now in
your Terraform state and will henceforth be managed by Terraform.
That’s it, your existing VM is part of your Terraform state and you can manage it from Terraform for further operations; like add new interface in future or add new hard disk etc.
We can verify the same using terraform show again.
$ terraform show
# vsphere_virtual_machine.vm:
resource "vsphere_virtual_machine" "vm" {
    boot_delay                              = 0
    boot_retry_delay                        = 10000
    boot_retry_enabled                      = false
    change_version                          = "2020-11-03T08:33:13.180937Z"
    cpu_hot_add_enabled                     = false
    cpu_hot_remove_enabled                  = false
    cpu_limit                               = -1
    cpu_performance_counters_enabled        = false
    cpu_reservation                         = 0
    cpu_share_count                         = 1000
    cpu_share_level                         = "normal"
    custom_attributes                       = {}
    datastore_id                            = "datastore-13"
    efi_secure_boot_enabled                 = false
    enable_disk_uuid                        = false
    enable_logging                          = true
    ept_rvi_mode                            = "automatic"
    extra_config                            = {}
    firmware                                = "bios"
    folder                                  = "DEV"
    force_power_off                         = true
    guest_id                                = "rhel7_64Guest"
    guest_ip_addresses                      = []
    hardware_version                        = 14
    host_system_id                          = "host-12"
    hv_mode                                 = "hvAuto"
    id                                      = "4219040f-5842-ba52-b7e4-cd9064c1f36c"
    ide_controller_count                    = 2
    imported                                = true
    latency_sensitivity                     = "normal"
    memory                                  = 2048
    memory_hot_add_enabled                  = false
    memory_limit                            = -1
    memory_reservation                      = 0
    memory_share_count                      = 20480
    memory_share_level                      = "normal"
    migrate_wait_timeout                    = 30
    moid                                    = "vm-47"
    name                                    = "DEV2"
    nested_hv_enabled                       = false
    num_cores_per_socket                    = 1
    num_cpus                                = 1
    pci_device_id                           = []
    poweron_timeout                         = 300
    reboot_required                         = false
    resource_pool_id                        = "resgroup-8"
    run_tools_scripts_after_power_on        = true
    run_tools_scripts_after_resume          = true
    run_tools_scripts_before_guest_reboot   = false
    run_tools_scripts_before_guest_shutdown = true
    run_tools_scripts_before_guest_standby  = true
    sata_controller_count                   = 1
    scsi_bus_sharing                        = "noSharing"
    scsi_controller_count                   = 1
    scsi_type                               = "pvscsi"
    shutdown_wait_timeout                   = 3
    swap_placement_policy                   = "inherit"
    sync_time_with_host                     = false
    tags                                    = []
    uuid                                    = "4219040f-5842-ba52-b7e4-cd9064c1f36c"
    vapp_transport                          = []
    vmware_tools_status                     = "guestToolsRunning"
    vmx_path                                = "DEV2/DEV2.vmx"
    wait_for_guest_ip_timeout               = 0
    wait_for_guest_net_routable             = true
    wait_for_guest_net_timeout              = 5

    cdrom {
        client_device  = false
        datastore_id   = "datastore-13"
        device_address = "sata:0:0"
        key            = 16000
        path           = "ISO/rhel-server-7.7-x86_64-dvd.iso"
    }

    disk {
        attach           = false
        controller_type  = "scsi"
        datastore_id     = "datastore-13"
        device_address   = "scsi:0:0"
        disk_mode        = "persistent"
        disk_sharing     = "sharingNone"
        eagerly_scrub    = false
        io_limit         = -1
        io_reservation   = 0
        io_share_count   = 1000
        io_share_level   = "normal"
        keep_on_remove   = true
        key              = 2000
        label            = "disk0"
        path             = "DEV2/DEV2.vmdk"
        size             = 20
        thin_provisioned = false
        unit_number      = 0
        uuid             = "6000C29b-c4f0-764a-9054-a042931350c4"
        write_through    = false
    }
}
Final Notes
If you are planning to manage the configuration inside the VM Operating System, please remember to use appropriate Provisioners .
Read vsphere_virtual_machine documentation for details.
You may see the full code references in GitHub under terraform-vmware-demos .
Gineesh Madapparambath
Gineesh Madapparambath is the founder of techbeatly. He is the co-author of The Kubernetes Bible, Second Edition and the author of Ansible for Real Life Automation. He has worked as a Systems Engineer, Automation Specialist, and content author. His primary focus is on Ansible Automation, Containerisation (OpenShift & Kubernetes), and Infrastructure as Code (Terraform). (Read more: iamgini.com)
Note
Disclaimer: The views expressed and the content shared in all published articles on this website are solely those of the respective authors, and they do not necessarily reflect the views of the author’s employer or the techbeatly platform. We strive to ensure the accuracy and validity of the content published on our website. However, we cannot guarantee the absolute correctness or completeness of the information provided. It is the responsibility of the readers and users of this website to verify the accuracy and appropriateness of any information or opinions expressed within the articles. If you come across any content that you believe to be incorrect or invalid, please contact us immediately so that we can address the issue promptly.