How to Install and Configure Ansible Automation Dashboard (On-Premise)
-
 Gineesh Madapparambath
- Automation, Dev ops, Ansible, Infrastructure, How to, Platform engineering
- October 14, 2025
Introduction
Automation Dashboard is part of Red Hat Ansible Automation Platform (AAP) that lets you visualize, measure, and optimize your automation usage across multiple clusters. Think of it as the central view of everything automated in your environment — jobs, trends, activity, and growth over time.
In this guide, I’ll show you how to install and configure Automation Dashboard (on-premise) for AAP 2.5 running at aap25.lab.iamgini.com.
The dashboard will be installed on a separate VM — automation-dashboard.lab.iamgini.com — using a containerized setup with an embedded PostgreSQL database.
Info
This is a custom, opinionated installation guide based on the official documentation.
Warning
Do not install the Automation Dashboard on the same host(s) as Ansible Automation Platform.
Pre-Installation Notes
-
The Automation Dashboard runs on port 8447 by default. You can change this in your inventory with:
nginx_https_port=8447
TLS Certificates
- For simplicity, we’ll use self-signed TLS certificates. If you’re connecting the dashboard with an existing AAP instance, you might hit SSL validation issues.
You can disable SSL validation for the auth provider in your inventory:
aap_auth_provider_check_ssl=false
If you prefer to validate SSL properly, copy and trust your AAP CA certificate on the dashboard VM:
# Copy CA cert from AAP node
$ scp aap-ca.cert devops@automation-dashboard:~/aap-ca.cert

# Update the CA trust on automation-dashboard VM
$ sudo cp aap-ca.cert /etc/pki/ca-trust/source/anchors/aap-ca.crt
$ sudo update-ca-trust
To confirm it’s trusted:
$ curl -v https://aap25.lab.iamgini.com/api/gateway/v1/ping/
Step 1: Prepare OAuth Application in AAP
Before installation, create an OAuth application inside your AAP:
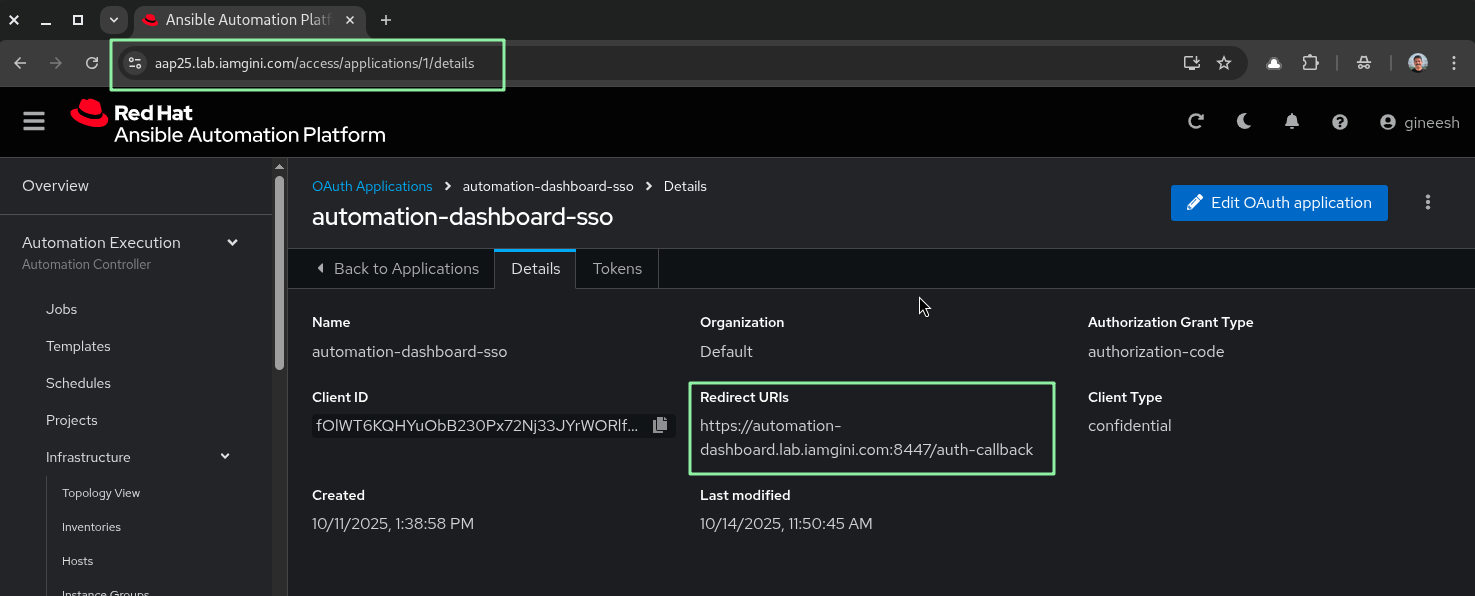
- Go to Access Management → OAuth Applications (
https://aap25.lab.iamgini.com/access/applications). - Click Create OAuth Application.
- Note down the Client ID and Client Secret — you’ll need these later.
Step 2: Download the Setup Bundle
Grab the installer from Red Hat’s download portal.

For this demo, I used the Red Hat Ansible Automation Dashboard Setup Bundle (2.6 for RHEL 9).

$ tar -xzvf ansible-automation-dashboard-containerized-setup-bundle-0.1-x86_64.tar.gz
$ cd ansible-automation-dashboard-containerized-setup/
Step 3: Prepare the Inventory and Secrets
Copy the example inventory and modify it to match your environment. A typical sample is provided below.
[automationdashboard]
automation-dashboard.lab.iamgini.com

[automationdashboard:vars]
aap_auth_provider_name=Ansible Automation Platform
aap_auth_provider_protocol=https
aap_auth_provider_aap_version=2.5
aap_auth_provider_check_ssl=true
initial_sync_days=1

aap_auth_provider_client_id='from_var_file'
aap_auth_provider_client_secret='from_var_file'
aap_auth_provider_host='from_var_file'

[database]
automation-dashboard.lab.iamgini.com

[all:vars]
postgresql_admin_username=postgres
postgresql_admin_password='from_encrypted_var_file'

registry_username='from_var_file'
registry_password='from_var_file'

dashboard_pg_containerized=True
dashboard_admin_password='from_encrypted_var_file'
dashboard_pg_host=automation-dashboard.lab.iamgini.com
dashboard_pg_username=aapdashboard
dashboard_pg_password='from_encrypted_var_file'
dashboard_pg_database=aapdashboard

bundle_install=false
bundle_dir='{{ lookup("ansible.builtin.env", "PWD") }}/bundle'
Here’s the layout I use — keeping sensitive values in separate files for clarity.
~/.config/aap-auth.yaml
aap_auth_provider_client_id: <client_id_from_AAP>
aap_auth_provider_client_secret: <client_secret_from_AAP>
aap_auth_provider_host: aap25.lab.iamgini.com
~/.config/registry.yaml
registry_username: '<registry_username>'
registry_password: '<registry_token>'
dashboard-credential.yaml
postgresql_admin_password: postgresadminsecretpass
dashboard_admin_password: aapadmin
dashboard_pg_password: aapdashboardpgadminsecretpass
Encrypt secrets with Ansible Vault:
$ ansible-vault encrypt dashboard-credential.yaml
Step 4: Run the Installer
Now run the installation playbook:
$ ansible-playbook -i inventory \
  ansible.containerized_installer.dashboard_install \
  -u devops \
  -e @~/.config/aap-auth.yaml \
  -e @~/.config/registry.yaml \
  -e @dashboard-credential.yaml \
  --ask-vault-password
After the playbook completes, the dashboard should be reachable at https://automation-dashboard.lab.iamgini.com:8447/
At this point, it’s running — but not yet connected to your AAP cluster.
Step 5: Integrate with Ansible Automation Platform
To visualize automation data, integrate AAP with your new dashboard.
- In your AAP dashboard, create a token (use a service account if available).
- OAuth Application:
automation-dashboard-sso - Scope:
read
- OAuth Application:

Copy the generated token and we will use this for clusters.yaml configuration in the next step.
Create clusters.yaml
---
clusters:
  - protocol: https
    address: aap25.lab.iamgini.com
    port: 443
    access_token: <your_token>
    verify_ssl: false
    sync_schedules:
      - name: Every 1 minute sync
        rrule: DTSTART;TZID=Europe/Ljubljana:20250630T070000 FREQ=MINUTELY;INTERVAL=1
        enabled: true
Step 6: Apply Cluster Configuration
Copy the clusters.yaml file into the running dashboard container:
$ podman cp clusters.yaml automation-dashboard-web:/
$ podman exec automation-dashboard-web /venv/bin/python ./manage.py setclusters /clusters.yaml
Then test data synchronization:
$ podman exec automation-dashboard-web /venv/bin/python ./manage.py syncdata --since=2025-04-01 --until=2025-12-31
Successfully created Sync task for Cluster https://aap25.lab.iamgini.com:443.
Step 7: Access the Dashboard
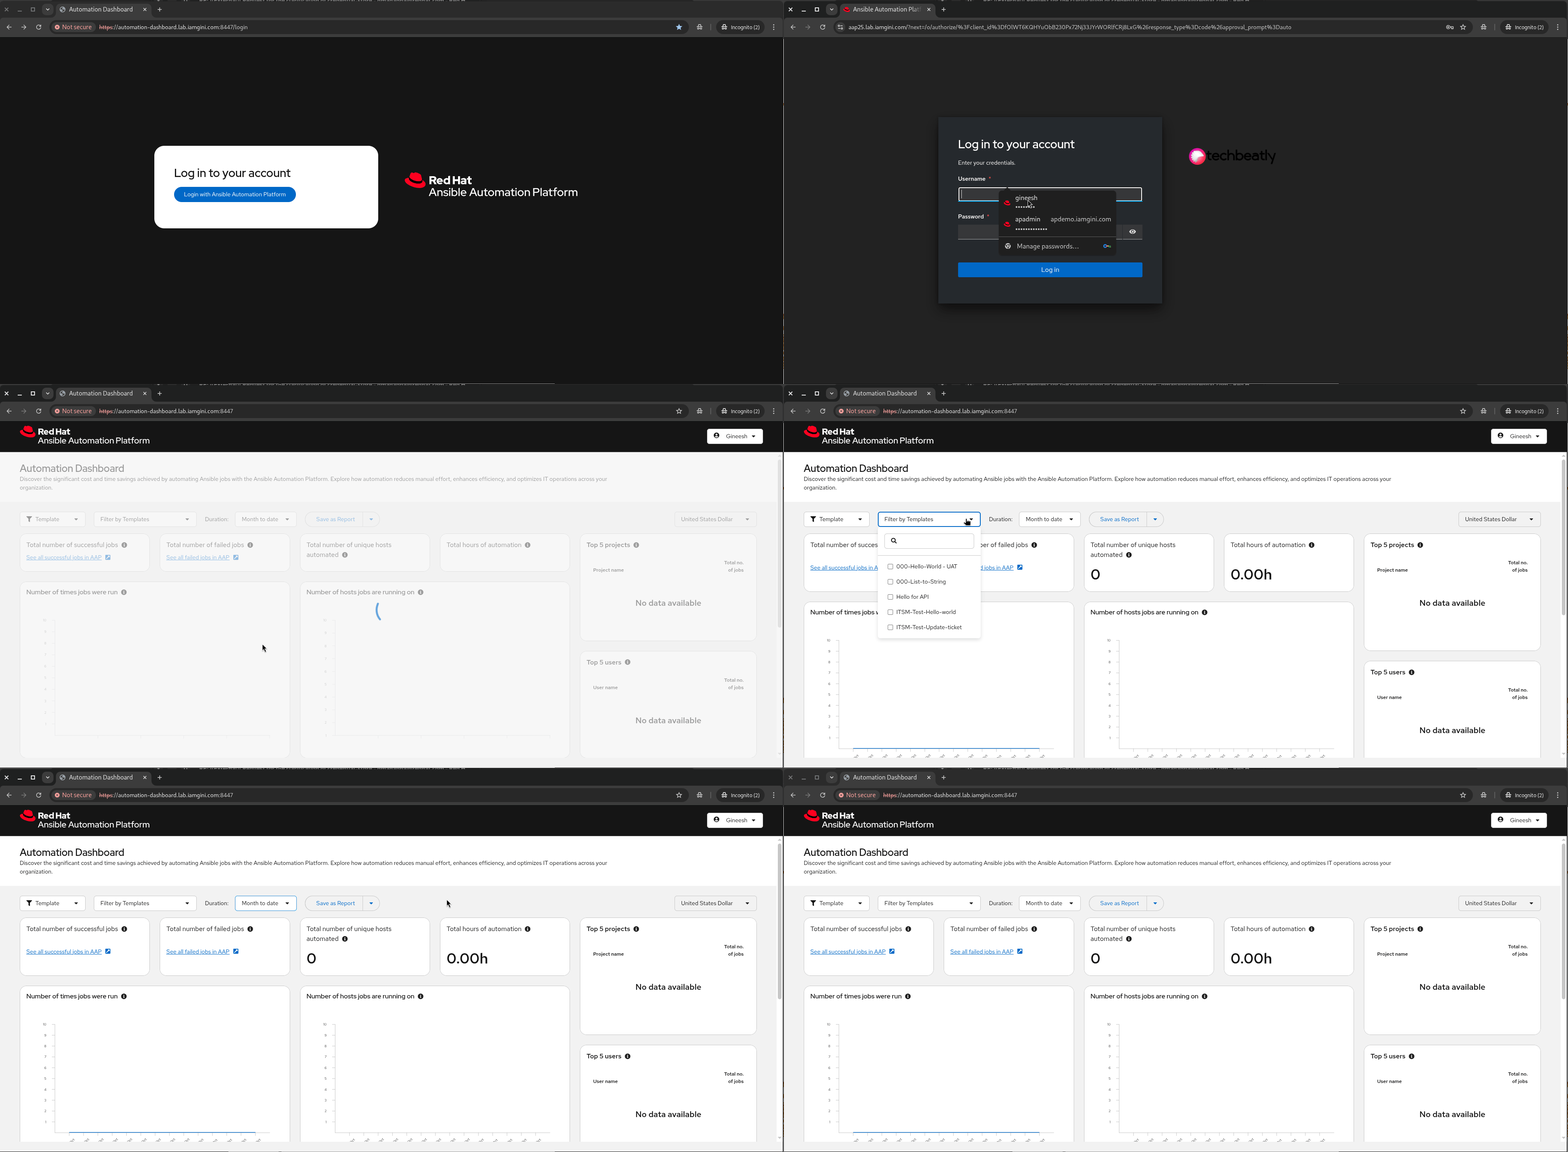
Now open your browser and visit: https://automation-dashboard.lab.iamgini.com:8447/
- You’ll be redirected to the AAP SSO login page.
- After login, you’ll be sent back to the dashboard, where you’ll start seeing aggregated data and trends.
Learn More
To explore dashboards, filters, and reporting features, check the official guide: 👉 Filter and save automation data for reporting
- You can check out sample configuration files and inventory examples used in this guide here: github.com/iamgini/ansible-aap-demos/tree/main/ansible-automation-dashboard.
- Automation dashboard and automation analytics
Final Thoughts
That’s it — your Automation Dashboard is up and running on-prem with containerized services. In production, replace the embedded database with an external enterprise PostgreSQL instance and use trusted SSL certificates.
This setup gives you a single pane of glass to track automation growth, identify trends, and improve ROI on your automation efforts.
Troubleshooting
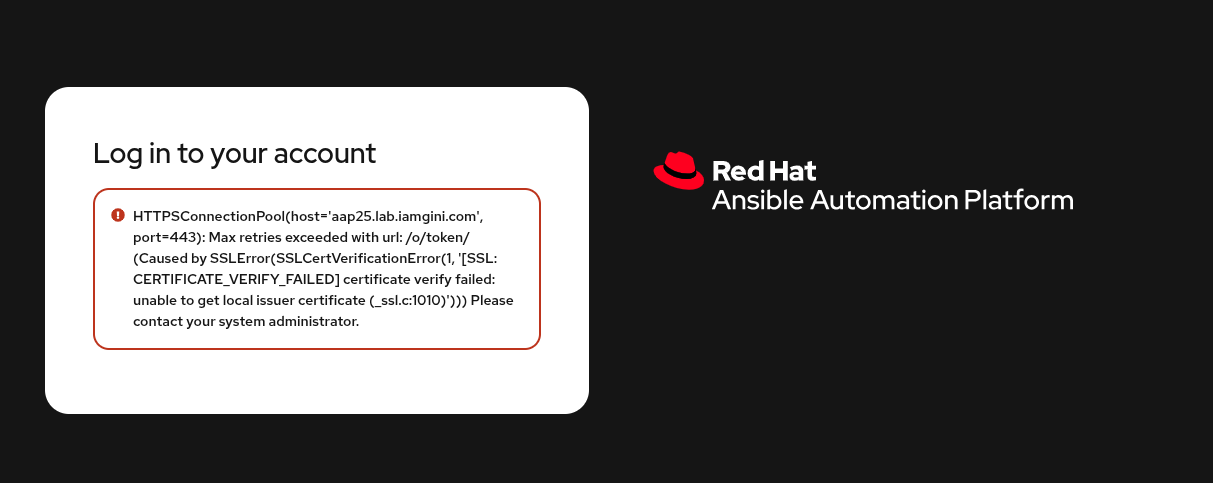
As mentioned earlier, if you’re using SSL validation and the CA certificate isn’t properly distributed, you might run into SSL-related errors.
Here’s an example of what those errors could look like (for reference):

Gineesh Madapparambath
Gineesh Madapparambath is the founder of techbeatly. He is the co-author of The Kubernetes Bible, Second Edition and the author of Ansible for Real Life Automation. He has worked as a Systems Engineer, Automation Specialist, and content author. His primary focus is on Ansible Automation, Containerisation (OpenShift & Kubernetes), and Infrastructure as Code (Terraform). (Read more: iamgini.com)
Note
Disclaimer: The views expressed and the content shared in all published articles on this website are solely those of the respective authors, and they do not necessarily reflect the views of the author’s employer or the techbeatly platform. We strive to ensure the accuracy and validity of the content published on our website. However, we cannot guarantee the absolute correctness or completeness of the information provided. It is the responsibility of the readers and users of this website to verify the accuracy and appropriateness of any information or opinions expressed within the articles. If you come across any content that you believe to be incorrect or invalid, please contact us immediately so that we can address the issue promptly.

