How to access applications deployed in minikube Kubernetes cluster using NodePort
-
 Gineesh Madapparambath
- Dev ops, Kubernetes, Deploy in minikube
- January 29, 2022
minikube is the most simple way to spin-up and use a Kubernetes cluster for your quick needs. You can install and use minikube clusters on Linux, Windows and Mac workstations without much knowledge about setting up a Kubernetes cluster. minikube will create a single VM cluster (by default) and you can adjust CPU and memory resources if you need more capacity for your Kubernetes cluster.
Check how to build a minikube cluster using vagrant and virtualbox .
If you have issues with virtualization (if virtualization is not enabled on workstation), you can use docker based minikube as well; refer documentation for more details.
minikube start --driver=docker
In this demo, we will deploy a simple nginx application using helm charts and access it from the host machine.
Deploy nginx application
We will use helm charts from bitnami to quickly deploy the application as our intention to show how to access the application. You can use the standard application deployment (deploy app, expose service etc.)
Add helm repo
$ helm repo add bitnami https://charts.bitnami.com/bitnami
Install nginx web server using helm chart
$ helm install nginx-web-server bitnami/nginx
NAME: nginx-web-server
LAST DEPLOYED: Sat Jan 29 12:14:33 2022
NAMESPACE: default
STATUS: deployed
REVISION: 1
TEST SUITE: None
NOTES:
CHART NAME: nginx
CHART VERSION: 9.7.5
APP VERSION: 1.21.6

** Please be patient while the chart is being deployed **

NGINX can be accessed through the following DNS name from within your cluster:

    nginx-web-server.default.svc.cluster.local (port 80)

To access NGINX from outside the cluster, follow the steps below:

1. Get the NGINX URL by running these commands:

  NOTE: It may take a few minutes for the LoadBalancer IP to be available.
        Watch the status with: 'kubectl get svc --namespace default -w nginx-web-server'

    export SERVICE_PORT=$(kubectl get --namespace default -o jsonpath="{.spec.ports[0].port}" services nginx-web-server)
    export SERVICE_IP=$(kubectl get svc --namespace default nginx-web-server -o jsonpath='{.status.loadBalancer.ingress[0].ip}')
    echo "http://${SERVICE_IP}:${SERVICE_PORT}"
Check pods and services
$ kubectl get pod,svc
NAME                                  READY   STATUS    RESTARTS   AGE
pod/nginx-web-server-7d9489c4-h775g   1/1     Running   0          21s

NAME                       TYPE           CLUSTER-IP     EXTERNAL-IP   PORT(S)        AGE
service/kubernetes         ClusterIP      10.96.0.1      <none>        443/TCP        152m
service/nginx-web-server   LoadBalancer   10.97.190.71   <pending>     80:30736/TCP   21s
We can see that the nginx pods and services are running fine.
Access the application
minikube will support both NodePort and LoadBalancer type accesses. In this case the external IP is pending as this is not configured yet. As we know the minikube is running inside the vm, we need to know the correct por-mapping for this nginx server.
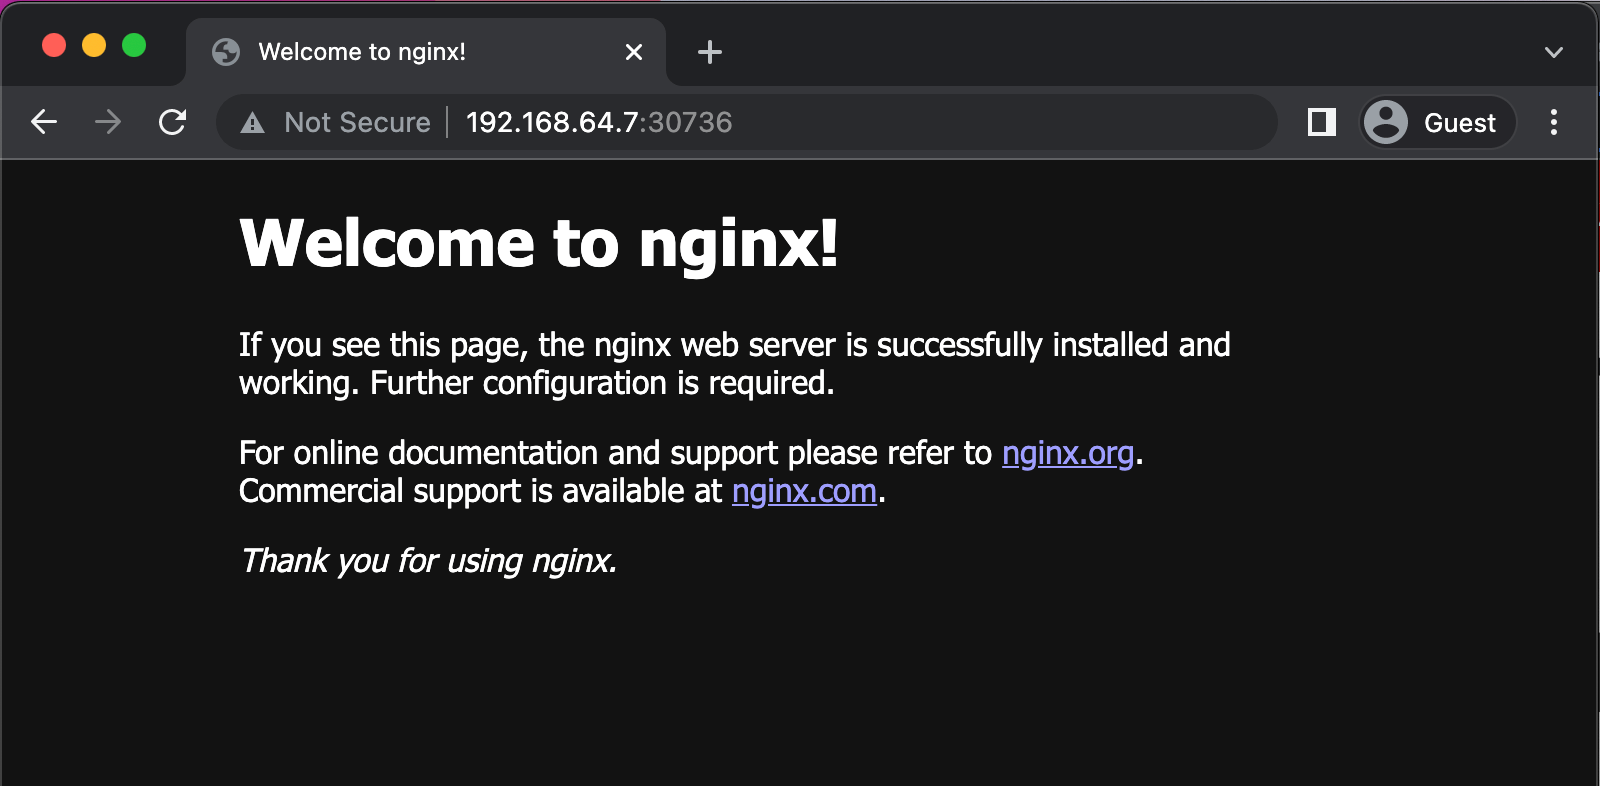
$ minikube service --url nginx-web-server
http://192.168.64.7:30736
Now you know the IP address and port to be used to access the nginx application. In this case, 192.168.64.7 is the IP address of minikube which you can also retrieve using the command minikube ip.
Open a browser and check your nginx application.
That’s it; you can try different applications and you will realize how easy it is to use minikube for your Kubernetes learning and development.
Wrap up
You can increase the NodePort range if you have multiple applications running or some different range is required.
minikube start --extra-config=apiserver.service-node-port-range=1-65535
Check minikube documentation for more details.
Gineesh Madapparambath
Gineesh Madapparambath is the founder of techbeatly. He is the co-author of The Kubernetes Bible, Second Edition and the author of Ansible for Real Life Automation. He has worked as a Systems Engineer, Automation Specialist, and content author. His primary focus is on Ansible Automation, Containerisation (OpenShift & Kubernetes), and Infrastructure as Code (Terraform). (Read more: iamgini.com)
Note
Disclaimer: The views expressed and the content shared in all published articles on this website are solely those of the respective authors, and they do not necessarily reflect the views of the author’s employer or the platform. We strive to ensure the accuracy and validity of the content published on our website. However, we cannot guarantee the absolute correctness or completeness of the information provided. It is the responsibility of the readers and users of this website to verify the accuracy and appropriateness of any information or opinions expressed within the articles. If you come across any content that you believe to be incorrect or invalid, please contact us immediately so that we can address the issue promptly.