Table of Contents
The problem with a static AWS inventory
Autoscaling groups spin instances up and down. Someone terminates a box and forgets to update the inventory file. A new environment gets tagged staging instead of stage, and nobody notices until a playbook runs against the wrong hosts. If you’re managing AWS with Ansible, a static inventory file goes stale the moment your fleet changes size, which for most teams is “constantly.”
The fix is to stop maintaining a host list by hand and let Ansible ask AWS directly, every time a job runs. That’s what the amazon.aws.aws_ec2 dynamic inventory plugin does.
I’ve covered dynamic inventory before with a Git-backed static file as the inventory source, which is great when your hosts don’t live in a cloud API. This post is the cloud-native sibling: instead of committing a host list to Git, Ansible queries the EC2 API on every sync and builds the inventory from tags, regions, and instance state.
Info
This guide focuses on Ansible Automation Platform (AAP) as the place you’ll actually run this in production, but everything in the “anatomy” section works identically from the CLI or ansible-navigator.
Quick CLI demo: the plugin in 30 seconds
Before touching AAP, it’s worth seeing the plugin work locally so you understand what you’re actually configuring later.
ansible-galaxy collection install amazon.aws
pip install boto3 botocore --break-system-packages
Create a file that ends in aws_ec2.yml (the suffix isn’t optional, the plugin loader matches on it):
# demo.aws_ec2.yml
plugin: amazon.aws.aws_ec2
regions:
  - ap-southeast-2
filters:
  instance-state-name: running
  tag:Project: blog-demo
keyed_groups:
  - key: tags.Environment
    prefix: env
hostnames:
  - tag:Name
compose:
  ansible_host: public_ip_address
Run it:
ansible-inventory -i demo.aws_ec2.yml --graph
@all:
  |--@ungrouped:
  |--@aws_ec2:
  |  |--db-01
  |  |--db-02
  |  |--web-01
  |  |--web-02
  |  |--app-01
  |--@env_dev:
  |  |--db-01
  |--@env_prod:
  |  |--db-02
  |  |--web-01
  |  |--web-02
  |--@env_staging:
  |  |--app-01
Five lines of YAML and you already have hosts grouped by environment, named after their Name tag, and reachable on their public IP. That’s the entire mental model. Everything else is refinement.
Anatomy of the aws_ec2.yml file
Breaking down each key from the sample above, since these are the ones you’ll actually touch:
regions- scope this to where your instances actually live. Leaving it empty queries every enabled region, which is slower and burns more API calls than you need.filters- a dictionary of EC2 API filter/value pairs.instance-state-name: runningis the most common one, since nobody wants terminated instances cluttering an inventory.keyed_groups- this is where dynamic grouping happens.key: tags.Environmentreads theEnvironmenttag off each instance and creates a group namedenv_<value>(thanks toprefix: env). Do this instead of maintaining group membership by hand.hostnames- a precedence list for what to call each host.tag:Namemeans “use the value of the Name tag.” If that tag is missing on an instance, the plugin falls through to whatever’s next in the list (or the instance ID if nothing matches).compose- lets you set host variables from Jinja2 expressions.ansible_host: public_ip_addressis the one line that actually makes the inventory usable, since it tells Ansible how to connect to each host, separately from what it’s named.
Getting hostnames right
This one trips people up because the same option name can mean two different things depending on how you write it. A plain string like tag:Name just uses that tag’s value. But you can also hand it a dictionary to control prefix and separator behavior:
hostnames:
  - name: 'private-ip-address'
    separator: '_'
    prefix: 'tag:Name'
That produces hostnames like webserver01_10.0.1.23, private IP prefixed with the instance’s Name tag. Useful when you have instances across VPCs that could otherwise share the same private IP and collide in the inventory.
Tip
List multiple entries under hostnames in order of precedence (ip-address, then dns-name, then tag:Name) so instances missing one attribute still get a sane fallback instead of failing the sync.
Configuring AWS Dynamic inventory in Ansible Automation Platform
The CLI version above is the same YAML you’ll paste into AAP’s source_vars field. Here’s the full flow.
1. Create a dedicated IAM service account
Before touching AAP, create a dedicated read-only IAM user for the inventory sync - one that can only describe EC2 resources and nothing else.
# Create the policy
aws iam create-policy \
  --policy-name aap-inventory-readonly \
  --policy-document '{
    "Version": "2012-10-17",
    "Statement": [{
      "Sid": "AnsibleInventoryReadOnly",
      "Effect": "Allow",
      "Action": [
        "ec2:DescribeInstances",
        "ec2:DescribeTags",
        "ec2:DescribeRegions"
      ],
      "Resource": "*"
    }]
  }'

# Create the user and attach the policy
aws iam create-user --user-name aap-inventory-reader
aws iam attach-user-policy \
  --user-name aap-inventory-reader \
  --policy-arn arn:aws:iam::<ACCOUNT_ID>:policy/aap-inventory-readonly

# Generate access keys - save these, the secret is shown only once
aws iam create-access-key --user-name aap-inventory-reader
Tip
Name the IAM user something that makes the purpose obvious - aap-inventory-reader or ansible-ec2-readonly. When you audit IAM users six months later, you’ll thank yourself.
2. Create the AWS credential in AAP
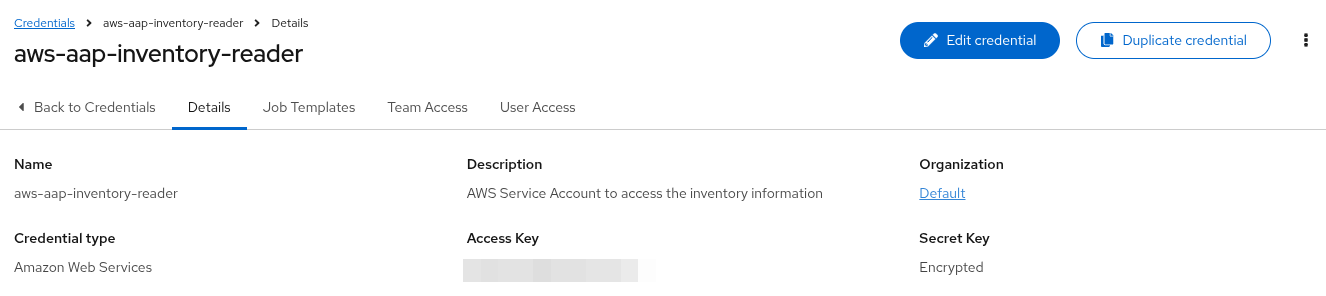
Go to Resources > Credentials and create a new credential using the Amazon Web Services credential type.
Warning
Long-lived IAM user access keys work here, but they’re the weaker option: a leaked key doesn’t expire on its own. Where your execution nodes run inside AWS, an IAM role attached to the instance (or an assumed role via iam_role_arn in source_vars) avoids storing static credentials in AAP at all.
3. Create the inventory and add the EC2 source
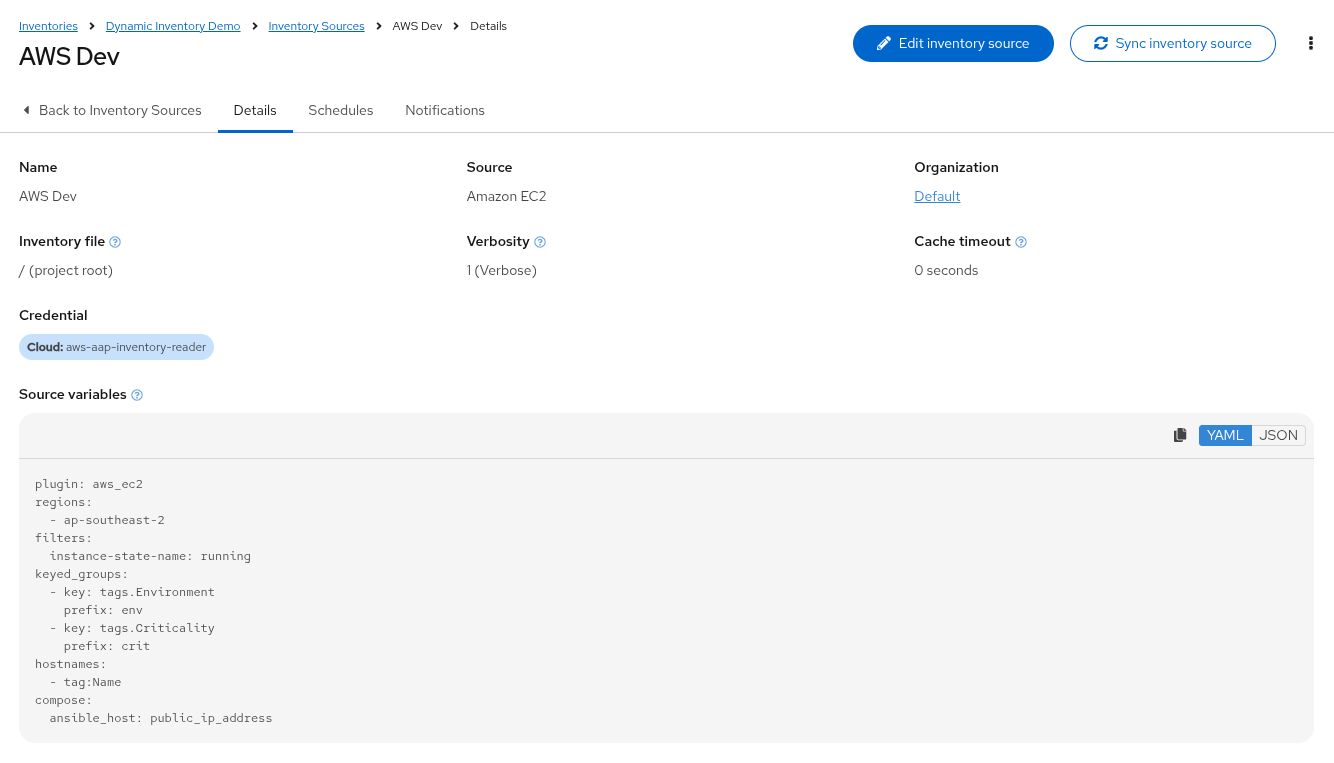
Create a new inventory, then go to its Sources tab and click Add. Choose Amazon EC2 as the source, select the credential from step 1, and pick an execution environment.
Paste the plugin config into Source variables:
plugin: aws_ec2
regions:
  - ap-southeast-2
filters:
  instance-state-name: running
keyed_groups:
  - key: tags.Environment
    prefix: env
  - key: tags.Criticality
    prefix: crit
hostnames:
  - tag:Name
compose:
  ansible_host: public_ip_address
4. Sync and verify
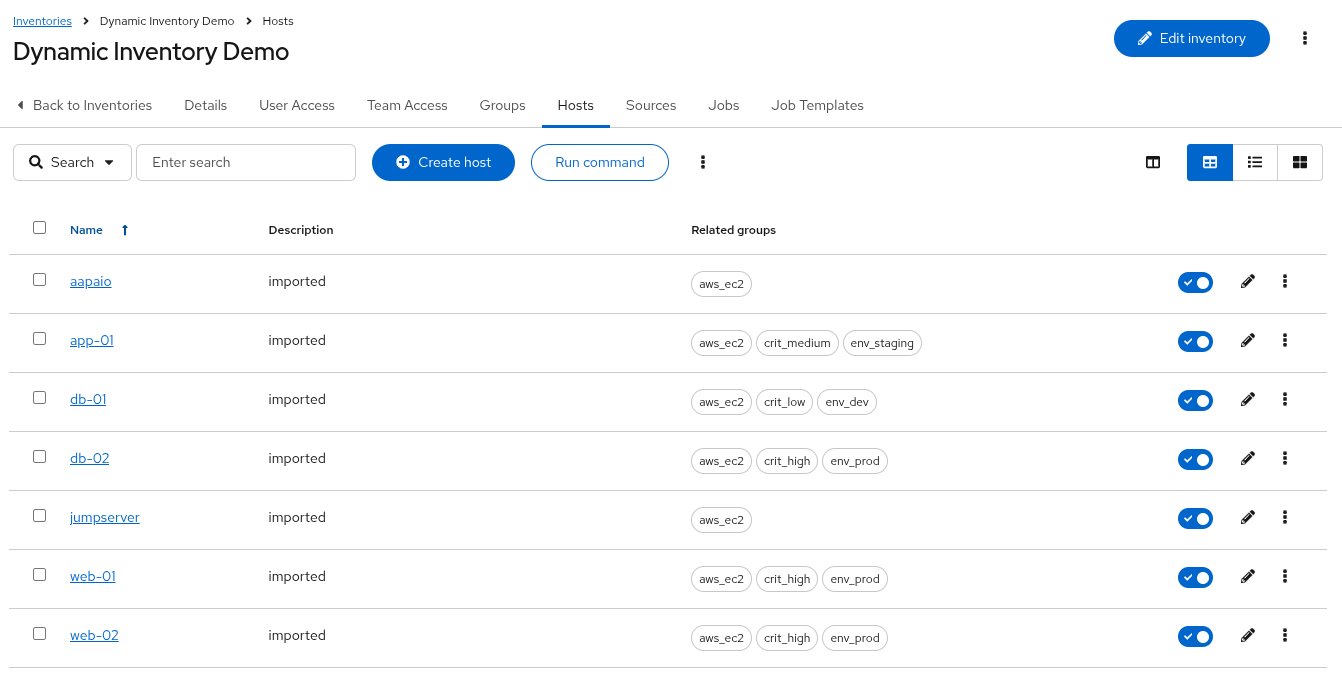
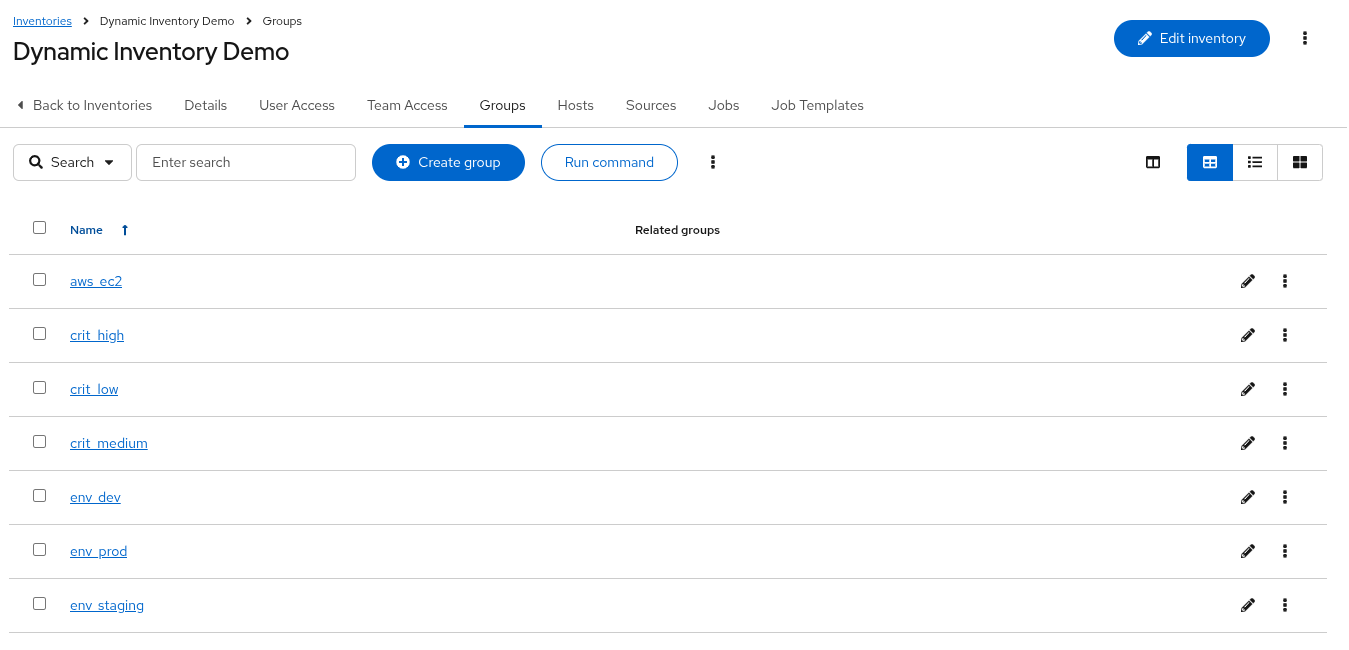
Save, then click Sync. Check the inventory’s Hosts and Groups tabs, you should see hosts grouped by env_* and crit_* based on the tags above.
Recommended practices
A few things that matter more once this is running in a real environment, not a demo.
- Scope by region and account. Don’t query every region by default. It slows the sync and burns API calls you don’t need. If you manage multiple AWS accounts, use separate inventory sources per account rather than one giant source trying to span all of them.
- Standardize your tags before you rely on them.
keyed_groupsis only as good as your tagging discipline. Agree on tag keys likeEnvironmentandCriticalityacross the team before building groups around them, otherwise you’ll get aenv_prod, anenv_Prod, and anenv_PRODUCTIONall as separate groups. - Use a read-only IAM role for the sync, not your automation role. The inventory sync only needs to describe instances, never modify them. A minimal policy looks like this:
{
  "Version": "2012-10-17",
  "Statement": [
    {
      "Sid": "AnsibleInventoryReadOnly",
      "Effect": "Allow",
      "Action": [
        "ec2:DescribeInstances",
        "ec2:DescribeTags",
        "ec2:DescribeRegions"
      ],
      "Resource": "*"
    }
  ]
}
This is narrower than the AWS-managed AmazonEC2ReadOnlyAccess policy, which also grants read access to snapshots, volumes, and several other EC2 sub-resources the inventory plugin never touches.
- Know where the sync actually runs. By default, AAP runs inventory sync jobs on the control plane, not on execution nodes. If your AWS account is only reachable from a specific network segment, associate the inventory source with an instance group that has that connectivity, rather than assuming any execution node will do.
- Split sources by environment. Separate
prod-ap-southeast-2anddev-ap-southeast-2sources, instead of one source filtered by tag, make RBAC simpler and mean a sync failure in dev doesn’t touch your production inventory.
Troubleshooting
Sync completes but returns zero hosts. Almost always a filter typo, or the credential’s region doesn’t match where your instances actually run. Test the same source_vars content locally with ansible-inventory -i test.aws_ec2.yml --graph first, it’s much faster to debug than re-running a sync in the UI.
Sync job errors out immediately. Check that the execution environment you selected actually has amazon.aws, boto3, and botocore installed. The default AAP execution environment usually does, a custom one might not.
Hosts appear but keep changing names between syncs. Your hostnames precedence list is probably falling through to something unstable, like dns-name on instances that get a new one on every stop/start. Pin it to a tag-based name instead.
Wrapping up
If you’re already comfortable with file-based dynamic inventory sourced from a project, the EC2 plugin is a smaller jump than it looks. Same source-and-sync pattern in AAP, just pointed at AWS’s API instead of a Git repo, with tags doing the grouping work a static file would otherwise need manual upkeep to match.
Happy Engineering!

Gineesh Madapparambath
Gineesh Madapparambath is the founder of techbeatly. He is the co-author of The Kubernetes Bible, Second Edition and the author of Ansible for Real Life Automation. He has worked as a Systems Engineer, Automation Specialist, and content author. His primary focus is on AI, Ansible Automation, Containerization (OpenShift & Kubernetes), and Infrastructure as Code (Terraform). (Read more: gineesh.com)
Note
Disclaimer: The views expressed and the content shared in all published articles on this website are solely those of the respective authors, and they do not necessarily reflect the views of the author’s employer or the platform. We strive to ensure the accuracy and validity of the content published on our website. However, we cannot guarantee the absolute correctness or completeness of the information provided. It is the responsibility of the readers and users of this website to verify the accuracy and appropriateness of any information or opinions expressed within the articles. If you come across any content that you believe to be incorrect or invalid, please contact us immediately so that we can address the issue promptly.
 Editorial